
Jeweled Jelly Bean Cake
Yield: 12 servings
Ingredients
Cake
- 2 ripe bananas, divided
- 4 eggs, divided
- 1 1/2 cups milk, divided
- 2 (16 ounce) boxes pound cake mix
Assembly
- 3 cups prepared vanilla frosting
- 10 ounces jelly beans in assorted flavors
Instructions
- Heat oven to 350 degrees F.
Cake
- Grease and flour both halves of an 8 1/2 inch three dimensional egg shape cake pan.
- In a large bowl of an electric mixer, mash one banana with a fork. Add two eggs and 3/4 cup milk; blend with mixer on low speed for 1 minute.
- Add one package of dry pound cake mix and beat at medium speed for three minutes.
- Pour batter into one of the prepared egg pans, filling 1/2 inch from top of pan. Set extra batter aside.
- Repeat steps for second pan. Combine the leftover batters and bake in a small prepared pan if desired.
- Bake egg cakes for about 55 minutes or until a wooden pick inserted into center of each cake comes out clean. If baking leftover batter, check for doneness after 30 minutes.
- Allow cakes to cool for 10 minutes on a cooling rack. Invert onto wax paper and cool thoroughly. Cakes may be made ahead and frozen.
Assembly
- Trim flat side of cakes, if necessary, using a long thin blade knife.
- Spread 3/4 cup frosting on the flat side of one of the halves. Press the two egg halves together gently.
- Trim underside of egg cake to sit flat. Secure on a cake cardboard or oval serving platter using 1/2 cup frosting.
- Generously frost exterior of cake with remaining frosting. Decorate with bands of candies.
- To serve, slice cake in half lengthwise, perpendicular to center frosting. Place cut side down and slice 3/4 inch thick.
Notes
Decorating Tip: To make neat rows, place jelly beans nestled side by side.
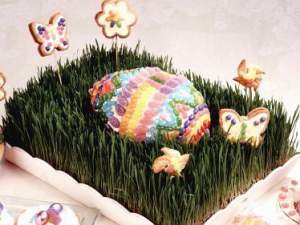
To Arrange Centerpiece: Place wheat grass on a decorative serving tray or large platter. Place cake in grass, using the oval baking stand nestled in the grass for support. Create a garden of pinwheels, butterflies and flowers by sticking bamboo skewers into the wheat grass as desired.
Attribution
Recipe and photo used with permission from: Jelly Belly