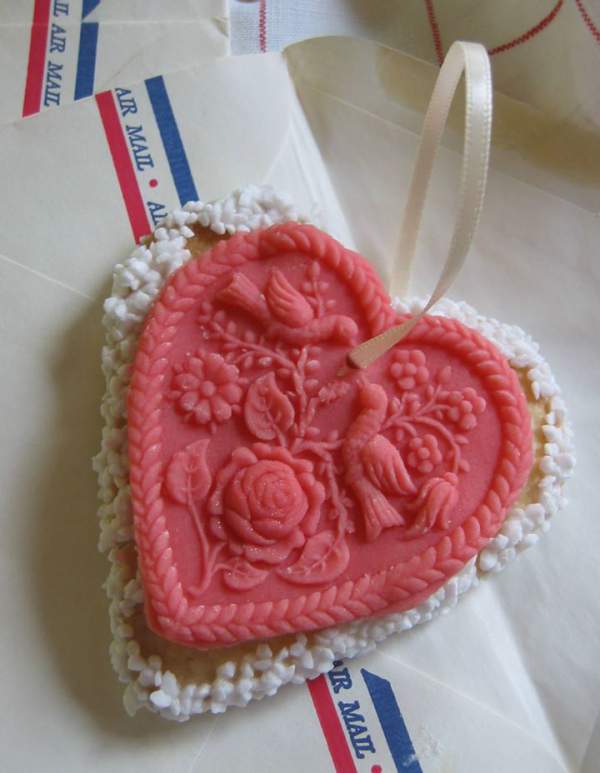
Love Letter Cookies
Call us old school, but something hand crafted still shows you care more than the latest gadget or flashy greeting card. Custom-decorated cookies are all the rage and we’ve found a way to make them easily at home. A crisp sugar cookie is the canvas for our Love Letter Cookies. A heart-shaped plaque of tinted marzipan sends the message and tastes terrific. We’ve fussed a bit with a little Royal Icing, pearl sugar garnish and a piece of satin ribbon, which is not really necessary. Tuck each cookie into an envelope before “sending.”

Yield: 2 dozen cookies
Ingredients
Cookies
- 2 cups all-purpose flour
- 1/4 teaspoon salt
- 3/4 cup (6 ounces) unsalted butter, softened
- 3/4 cup granulated sugar
- 1 large egg
- 1 teaspoon vanilla extract
Garnish and Icing
- Powdered sugar for dusting molds and work surface
- Red food coloring (optional)
- 1 to 2 cans Love’n Bake® Marzipan, depending on the size of the cookie
- 2 to 3 cups pear sugar or other decorative sugar
- 1 1/2 cups powdered sugar
- 2 to 3 tablespoons lemon juice
- Satin ribbon (optional)
Instructions
Cookies
- Heat oven to 325 degrees F. Line 2 or 3 baking sheets with parchment paper.
- Stir the flour and salt together.
- In the bowl of a mixer fitted with the paddle, bowl cream the butter and sugar on medium speed. Add the egg and vanilla extract and beat until well mixed. Scrape down sides of bowl, and then add the flour mixture. Blend on low speed until just combined without over mixing.
- Gather dough into a ball. Flatten the ball into a disk and wrap tightly in plastic wrap or a plastic bag. Refrigerate 1 hour until firm.
- On a floured surface, roll out the dough to 1/4-inch thickness. Cut the dough into heart shapes. Place the cutout dough on the baking sheets spaced 1 inch apart.
- Bake until the dough is set and lightly golden but not browned, for about 13 to 15 minutes. Immediately transfer cookies with a spatula to a wire rack to cool.
Marzipan Plaques
- To decorate the cookies using an embossed mold, tap out any excess that clings to the mold. Lightly dust a clean work surface with powdered sugar. Knead a small amount of food coloring into the marzipan to tint it if desired. Divide the Love’n Bake Marzipan into 24 pieces. (For 3 inch heart-shaped cookies, use approximately 4 tablespoons Marzipan.) Working with one piece of marzipan at a time, roll it out into a smooth ball. Press the marzipan out into a flat disc 1/4 inch thick about the size of the mold. Press the flattened marzipan into the mold, making certain it adheres in each impression. Carefully peel away the marzipan from the edges of the mold then gently remove the entire piece. Repeat with the remaining marzipan.
- Set the impressions on a flat plat then trim away any excess with a sharp knife. Cover the marzipan plaques with plastic wrap until ready to assemble the cookies. (Alternately, roll out the marzipan as described. Lightly impress anything textured into the sheet of marzipan such as a clean button or embossed cup. Use a cookie cutter or a sharp paring knife to cut out heart shapes.)
To assemble
- Pour the pear sugar out onto a clean, flat plate. Combine the 1 1/2 cups powdered sugar and enough of the lemon juice to make a smooth paste. Dip the edges of a cooled cookie into the icing then into the pearl sugar.
- Place the cookie on a clean sheet tray and repeat with the remaining cookies. Spread 1/2 teaspoon royal icing in the center of each cookie. Position a marzipan plaque on top of the icing.
- Allow the cookies to set at least and hour. To affix the satin ribbon, gently pierce a hole in the top of each cookie using a clean awl or tiny screwdriver. Twist gently because applying too much pressure may crack the cookie. Thread narrow ribbon through the hole.
Notes
We used a favorite sugar cookie recipe but purchased dough would also work well. Make as many or few cookies as you need, freezing the extra dough for another use. (The sugar cookie recipe is adapted from 100 Recipes from the Kitchen of Mrs. Fields.)
These cookies will taste delicious for at least a week when stored tightly sealed in plastic. They will look lovely for much, much longer.
Attribution
Recipe and photo used with permission from: Love’n Bake® - AmericanAlmond.com

