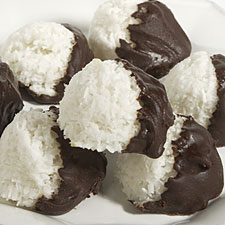
Chocolate-Dipped Coconut Macaroons
These coconut macaroons are sticky-moist on the inside, and coated with rich dark chocolate. Without flour or leavening, they're a sweet finish to the Passover seder.

Preo: 15 to 20 min | Bake: 10 to 12 min | Yield: 33 macaroons
Ingredients
Macaroons
- Generous 5 cups shredded unsweetened coconut
- 1 1/2 cups sweetened coconut cream (one 16 ounce can)
- 1/4 teaspoon salt
- 1/2 teaspoon coconut flavor (optional)
- 1/3 cup coconut milk powder (optional)
Coating
- 1 1/2 cups semisweet chocolate chips
- 2 1/2 tablespoons butter or margarine
- 2 tablespoons light corn syrup or honey
Instructions
- Heat the oven to 350 degrees F. Lightly grease a baking sheet, or line with parchment.
- In a medium bowl, mix together the coconut, coconut cream, salt, and coconut flavor, stirring until thoroughly combined.
- Add the coconut milk powder, stirring to combine.
- Drop the sticky mixture in ping pong-sized balls (about 1 1/2 inch) onto the prepared baking sheets. It helps to use a tablespoon cookie scoop or small ice cream scoop here. For best results, pack the coconut mixture into the scoop; each ball should weigh about 1 ounce. You can space the balls fairly close together on the baking sheet; they only need about 3/4 to 1 inch between them.
- Bake the macaroons for about 10 minutes; they won't brown. You may see the merest hint of brown on top.
- Remove from the oven, and cool completely on the baking sheet.
- To make the coating, heat the chocolate chips, butter and corn syrup until the chips are very soft. A microwave oven works well, as does a saucepan set over very low heat.
- Dip half of each cooled macaroon into the chocolate. Set the macaroons back on the baking sheet, and allow the chocolate to set completely before serving.
- To store, place in one layer in a closed container. They'll keep for 2 or 3 days, but will gradually become less moist as they sit.
Attribution
Recipe and photo used with permission from: King Arthur Flour
Air Fryer ~ American Regional ~ Appetizers ~ Baby Food ~ Back of the Box ~ Beans ~ Beverages ~ Bowls/Buddha Bowls ~ Bread ~ Breakfast/Brunch ~ Camping/Hiking ~ Candy ~ Canning ~ Casseroles ~ Celebrity ~ Condiments ~ Cookies ~ Cooking for a Crowd ~ Cooking for Two ~ Cowboy/Ranch ~ Crock Pot ~ Dessert ~ Diet ~ Energy Bars ~ Family Favorites ~ Fish/Seafood ~ Gifts in a Jar ~ Grill ~ Holidays ~ Home Remedies ~ Instant Pot ~ International ~ Jiffy Mixes ~ LuAnn's Family Favorites ~ Meat ~ Meatless ~ Mixes ~ Name Brand ~ Nutella ~ Packet Cooking ~ Pampered Chef ~ Pasta/Rice/Beans ~ Pet Food ~ Picnic ~ Pizza ~ Potluck ~ Pressure Cooker ~ Restaurant ~ Salads/Salad Dressings ~ Sandwiches ~ Sauces ~ School Cafeteria ~ Seasoning/Flavored Oil/Vinegar ~ Sheet Pan ~ Side Dishes/Veggies ~ Snacks ~ Soup/Stew/Chili ~ Spreads ~ State Fair ~ Syrup ~ Tofu ~ TVP ~ Two-Ingredients ~ Vegetarian ~ Wild Game
Articles ~ Cooks Corner ~ Glossary (Dictionary) ~ Household Hints ~ Kitchen Hints

